
How to divide data into equal intervals in Excel
 By
SpreadCheaters
By
SpreadCheaters
Splitting data into equal intervals creates standardized groups, enabling easy comparison between different segments. This approach facilitates direct comparisons by dividing the data into equal intervals. By establishing consistent boundaries, the data is organized into easily comparable segments. This standardized division enables efficient analysis and evaluation across various groups, facilitating straightforward comparisons.
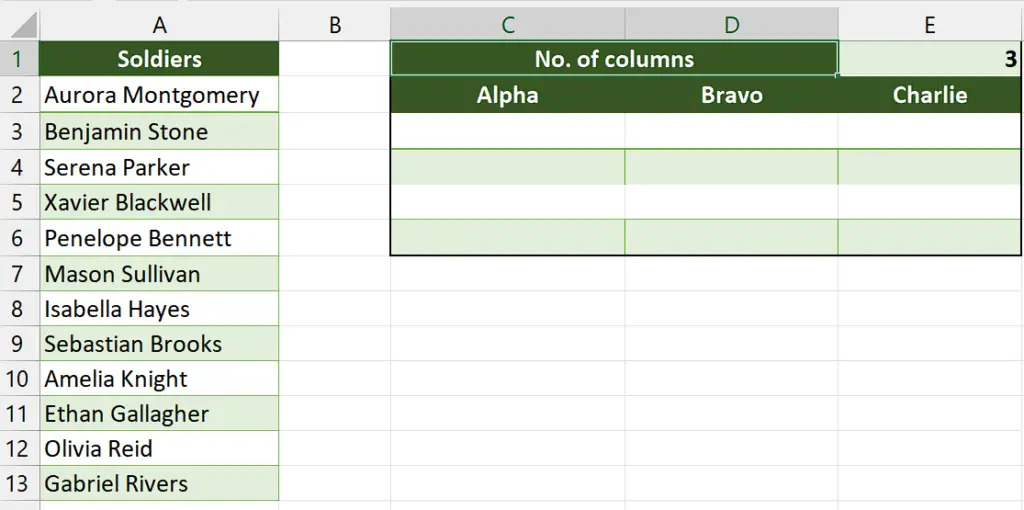
Let’s consider a dataset comprising the names of soldiers, and our objective is to evenly divide them into three groups: Alpha, Bravo, and Charlie. Using this scenario, we can explore the process of dividing data into equal intervals and learn how to achieve equitable distribution within these groups.
Method 1 – By using multiple functions
Understanding Functions and their syntax
INDEX Function:
The syntax is as follows:
=INDEX(array, row_num, [column_num])
The INDEX function is used to retrieve a value or reference from a specific cell within an array or range.
array: This is the range or array from which you want to retrieve a value.
row_num: It specifies the row number within the array from which you want to retrieve the value.
column_num (optional): It specifies the column number within the array. If omitted, the function returns the entire row specified by row_num.
COLUMNS Function:
The syntax of this function is below:
=COLUMNS(array)
The COLUMNS function is used to count the number of columns within a given array or range.
array: This is the range or array for which you want to count the number of columns.
ROWS Function:
Syntax of ROWS Functions is as follows:
=ROWS(array)
The ROWS function is used to count the number of rows within a given array or range.
array: This is the range or array for which you want to count the number of rows.
IF Function:
The syntax of the IF Function is as follows:
=IF(logical_test, value_if_true, value_if_false)
The IF function allows you to perform conditional evaluations and return different values based on the result of a logical test.
logical_test: This is the condition or logical test that you want to evaluate.
value_if_true: It specifies the value to be returned if the logical_test evaluates to TRUE.
value_if_false: It specifies the value to be returned if the logical_test evaluates to FALSE.
Step 1 – Write the number of columns
- Select any empty cell and write the number of columns in that cell.
- For example, we have written “3” in cell “E1”.
- This will assist us in writing formula later in this tutorial.
Step 2 – Select a cell

- Select any empty cell which we will use as the first cell of the groups.
- We will apply the formula containing multiple functions in this cell.
Step 3 – Write the formula
- Write the following formula in the cell.
=IFERROR(IF($E$1>=COLUMNS($A$2:A2),INDEX($A$2:$A$13,(ROWS($A$2:A2))*$E$1-($E$1-COLUMNS($A$2:A2))),””),””)
Where,
E1 is the cell containing the number of columns in the cell.
A2:A2 is the cell that contains the first person or first cell we want to divide into groups.
A2:A13 is the range containing all cells that we wish to divide equally.
- After writing the formula, press Enter and the result will appear in the cell.
Step 4 – Divide the data into equal intervals
- Now, use the fill handle to drag this data to the rows and columns.
- In this way, we can divide the data into equal intervals.
Method 2 – By using the VBA code
Step 1 – Add a module
- For adding a module, navigate to the Developer tab.
- After that, click on the first option named Visual Basic.
- You’ll see a new window on your screen and you can also open this window by using the shortcut key (Alt+F11) as well.
- Then, click on the Insert tab in this window and click on the Module option.
- Now, a new module would open.
Step 2 – Write the code
- Now, copy and paste the following code into the module.
Sub Split_Equal()
Dim inputRange As Range
Dim outputRange As Range
Dim textSelection As String
Dim outputArray As Variant
Dim groupSize As Long
Dim numRows, numColumns As Long
On Error Resume Next
textSelection = ActiveWindow.RangeSelection.Address
Sel:
‘ Select the input range
Set inputRange = Nothing
Set inputRange = Application.InputBox(“Select input range:”, “Range”, textSelection, , , , , 8)
If inputRange Is Nothing Then Exit Sub
‘ Check for multiple selections
If inputRange.Areas.Count > 1 Then
MsgBox “Multiple selections are not supported, select again”, vbInformation, “Range”
GoTo Sel
End If
‘ Check for multiple columns
If inputRange.Columns.Count > 1 Then
MsgBox “Multiple selections are not supported, select again”, vbInformation, “Range”
GoTo Sel
End If
‘ Select the output cell
Set outputRange = Application.InputBox(“Select a cell to view the output:”, “Start Range”, , , , , , 8)
If outputRange Is Nothing Then Exit Sub
‘ Specify the group size
groupSize = Application.InputBox(“Number of cells per column:”, “Cell Number”, , , , , , 1)
If groupSize < 1 Then
MsgBox “Incorrect input, please enter a valid cell number”, vbInformation, “Cell Number”
Exit Sub
End If
‘ Calculate the number of rows and columns in the output array
numRows = Int(inputRange.Rows.Count / groupSize) + 1
numColumns = groupSize
ReDim outputArray(1 To numColumns, 1 To numRows)
Dim rowIndex As Long
Dim columnIndex As Long
‘ Split the input data into equal groups and store it in the output array
For rowIndex = 0 To inputRange.Rows.Count – 1
outputArray(1 + (rowIndex Mod numColumns), 1 + Int(rowIndex / numColumns)) = inputRange.Cells(rowIndex + 1)
Next
‘ Output the data to the specified output range
outputRange.Range(“A1”).Resize(numColumns, numRows) = outputArray
End Sub
- After that, close the VBA Editor.
Step 3 – Divide the data into equal intervals
- After closing the VBA Editor, press “Alt+F8” and the dialogue box would appear on your screen.
- Then, click on the macro named “Split_Equal” and click on Run.
- Now, input the cell range in the dialogue box that has just appeared.
- As soon as you click on “OK” another dialogue box will open.
- Input the cell address in the provided dialogue box. This cell will serve as the starting point for dividing the data into equal intervals.
- After that another dialogue box would appear.
- In this dialogue box, enter the number of cells that you want to have in each column.
- Then, click on “OK” and your data will be equally divided into the groups.


