
How to change the default currency in Excel
 By
SpreadCheaters
By
SpreadCheaters
Excel determines the default currency based on the regional settings of the operating system it is running on. It usually takes into account the language and location settings to determine the default currency. For example, if the operating system is set to the United States with English as the language, the default currency in Excel will typically be set to US dollars ($). However, users can manually change the default currency settings in Excel to suit their specific needs and preferences.
In this tutorial, we’ll learn how to change the default currency of Excel. However, it’s crucial to keep in mind that changing Excel’s default currency will have an impact on how currency formats are displayed throughout the program. The revised default currency format will be used for any new cells you enter, but any existing cells with currency values won’t be automatically translated to the new currency.
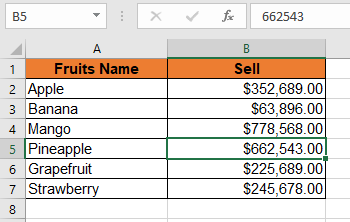
Let’s assume that we have the following dataset in which currently the default currency is USD.
Method 1 – Change Windows settings used to change currency
The simplest method to change the default currency of the systems is by using the operating systems’ settings. In our case, we are using Windows that’s why we’ll follow the steps mentioned below to change the default currency.
Step – 1 – Go to the Start Menu
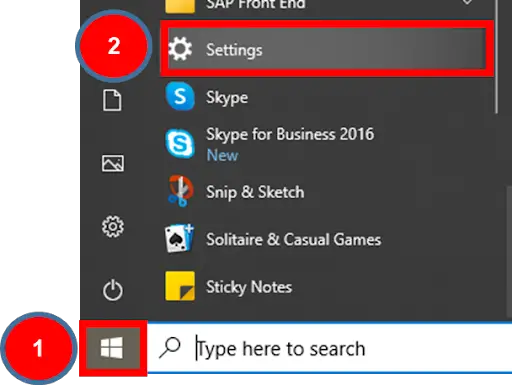
- Click on the start menu button.
- Go into the Setting option, as we can observe in the picture below.
Step – 2 – Select the Time & Language option
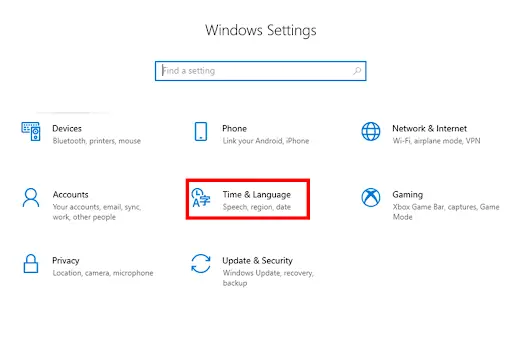
- Now, select the “Time & Language” option, see the picture below.
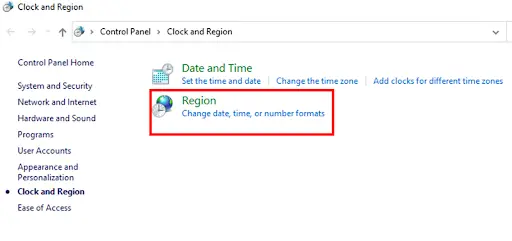
Step – 3 – Go into the “Additional Date Time & Regional Setting

- Now, click on the “Region” option.
- Click on the “Additional date time & regional setting”.
Step – 4 – Select the Region Option
- Now, click again the “Region” option, as shown in the picture.
Step – 5 – Select the Desired Currency
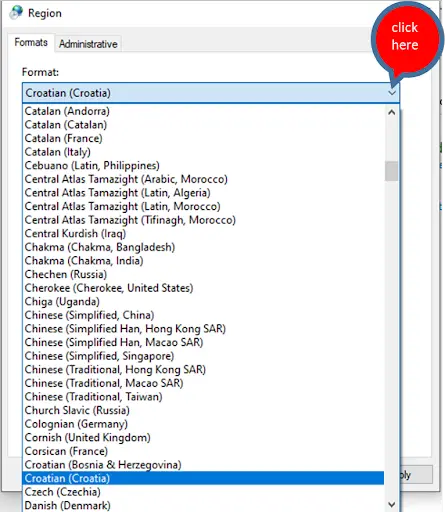
- Click on the drop-down arrow to open the list.
- Select the currency.
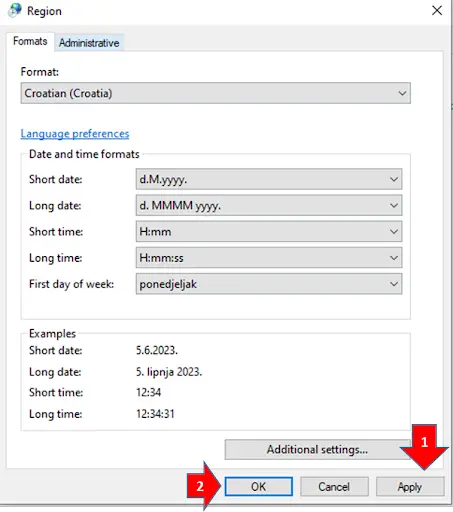
Step – 6 – Application of Changes

- Now press the “Apply” and then the “OK” button for changing the currency.
- Get back from the setting option, and go to the Excel worksheet.
Step – 7 – Go back to the Home tab
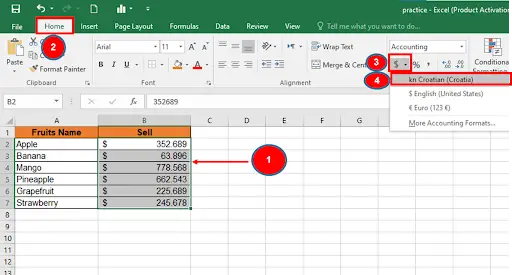
- Select the column & go to the Home tab.
- Click on the drop-down arrow next to the $ sign in the Number group as shown in the image.
- The currency that we have chosen will appear in this drop-down option as shown in the image below.
Step – 8 – Currency format will be changed
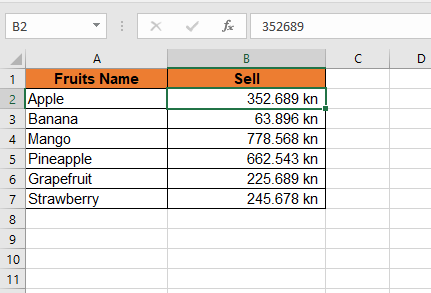
- Finally, the data will look like below and the currency format will be changed.
Method 2 – Use the Control Panel to change the Default Currency
We can also use the control panel settings to change the default currency of the system. Let’s see how to do it by following the steps mentioned below.
Step – 1 – Go to the Start Menu

- Go to the start menu button.
- Select the option “Control Panel” to change the default currency.
Step – 2 – Select the Clock & Region option
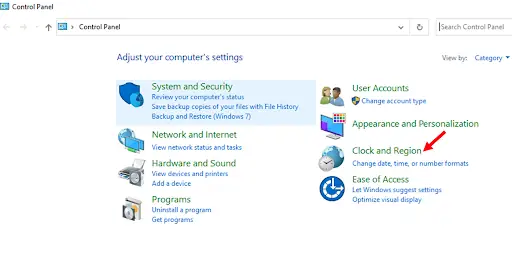
- Click on the “Clock & Region” option, see picture.
Step – 3 – Select the Region change date time option

- Again we need to click on the “Region” option as stated at # 1 in the below picture.
- Then, to the selection of desired currency, see the screen.
Step – 4 – Application of Changes
- Finally, click on the “Apply” button.
- Then press “OK” to apply the changes.
Step – 5 – Go to the Home tab

- Now go back to the Excel worksheet.
- Select the column in which we need to change the currency.
- Click on the drop-down arrow button as stated at # 3 near the dollar sign.
- .We can observe that currency that was taken from the “Control Panel” option, is appear at # 4, click on it.
Step – 6 – Condition Outcome

- Finally, the data will look like this. After this whenever you apply the default currency Excel will use the new currency that you had chosen.


