
How to limit Microsoft Excel sheet size
 By
SpreadCheaters
By
SpreadCheaters
Restricting the size of an Excel sheet involves intentionally setting boundaries on the number of rows and columns available for use in the worksheet. This limitation is often implemented to regulate the volume of data that can be entered or to maintain compatibility with specific systems or applications.
In this tutorial, we will learn how to limit Microsoft Excel sheet size. There are various approaches to limit the sheet size in Excel, one can hide the rows and columns to limit the sheet size or a VBA code can also be applied.
Suppose we have a data set consisting of 10 rows and 4 columns, and our objective is to restrict the Excel sheet to encompass only the size required to accommodate this data.
Method 1: Hiding the Rows and Columns to Limit the Sheet
An easy approach to limit the size of an Excel sheet is by hiding the columns and rows beyond the data itself. By doing so, the sheet size is automatically constrained to accommodate data only in the specific rows and columns.
Step 1 – Hide the Columns without Data
- Perform a click on the header of the column adjacent to the column containing the data.
- Press the CTRL+SHIFT+ “➡” keys on the keyboard to select all the columns without data.
- Right-click anywhere in the selection and perform a click on the “Hide” option.
Step 2 – Hide the Rows without Data
- Perform a click on the header of the row adjacent to the row containing the data.
- Press the CTRL+SHIFT+ “↓” keys on the keyboard to select all the columns without data.
- Right-click anywhere in the selection and perform a click on the “Hide” option.
- Now the sheet will be limited to only the rows and columns containing data.
Method 2: Limiting the Scroll Area
We can also limit the Excel sheet size by limiting the scroll area. This can be done by utilizing the Properties Window located in the Developer tab.
Step 1: Press the ALT+F11 Keys
- Press the ALT+F11 keys on the keyboard.
Step 2 – Locate the “Properties Window” Option
- Locate the “Properties Window” option in the View menu.
- Perform a click on the “Properties Window” option.
Step 3 – Input the Reference of the Range Containing Data

- Input the reference of the range containing the data in the “Scroll Area” field.
- The sheet size will be limited.
Step 4 – Checking whether the Sheet Size is Limited
- Checking whether the sheet size is limited by clicking on any cell outside the range containing data.
Method 3: Applying a VBA Code
VBA codes can be effectively employed to accomplish specific tasks with usefulness and efficiency. To restrict the size of a sheet, we can utilize the VBA code.
Step 1 – Press the ALT+F11 Keys

- Press the ALT+F11 key on the keyboard.
Step 2 – Insert a New Module
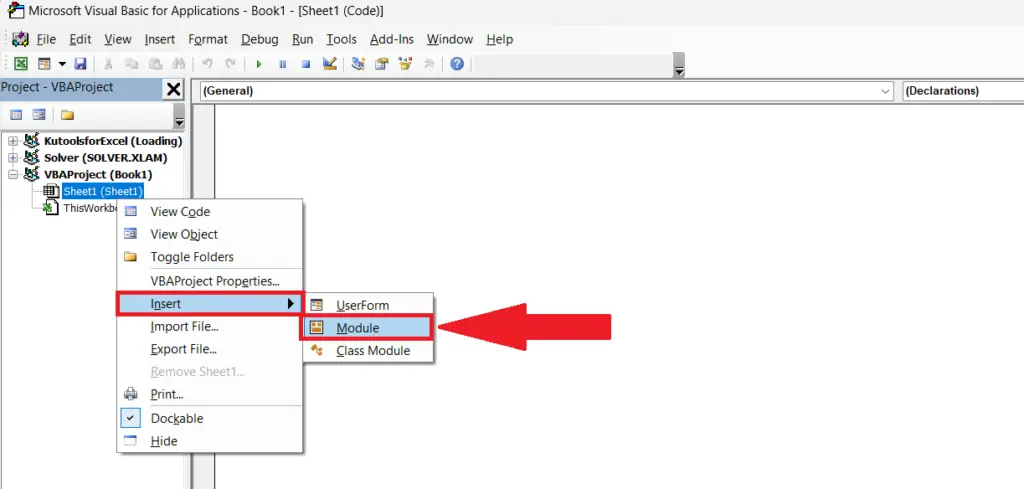
- Insert a new module to apply a VBA code.
Step 3 – Run the VBA Code
| Sub LimitSheetSize() Dim ws As Worksheet Set ws = ThisWorkbook.ActiveSheet ‘ Hide columns beyond column XFD ws.Range(“E:XFD”).EntireColumn.Hidden = True ‘ Hide rows beyond row 1048576 ws.Rows(“12:1048576”).EntireRow.Hidden = True End Sub |
- We have to input the column adjacent to the column containing the data i.e. “F: XFD”.
- The next range i.e. “12:1048576” is the range of rows to be restricted. We have changed the first reference i.e. 12
Breakdown of the code used in Method 3:
| Sub LimitSheetSize() Dim ws As Worksheet Set ws = ThisWorkbook.ActiveSheet ‘ Hide columns beyond column XFD ws.Range(“E:XFD”).EntireColumn.Hidden = True ‘ Hide rows beyond row 1048576 ws.Rows(“12:1048576”).EntireRow.Hidden = True End Sub |
Let’s break down the code step by step:
The line Dim ws As Worksheet declares a variable named “ws” of the type Worksheet. This variable will be used to represent the active worksheet.
The line Set ws = ThisWorkbook.ActiveSheet assigns the currently active sheet in the workbook containing the VBA code to the variable “ws”. The term “ThisWorkbook” refers to the workbook that contains the VBA code, and “ActiveSheet” refers to the sheet that is currently active.
The line ws.Range(“E:XFD”).EntireColumn.Hidden = True hides all the columns from column E to the last column (column XFD) on the active sheet. The “EntireColumn” property selects the entire range of columns, and setting the “Hidden” property to True hides those columns.
The line ws.Rows(“12:1048576”).EntireRow.Hidden = True hides all the rows from row 12 to the last row (row 1048576) on the active sheet. The “EntireRow” property selects the entire range of rows, and setting the “Hidden” property to True hides those rows.
In summary, this code sets the active worksheet as the target, hides all columns from E to XFD, and hides all rows from 12 to 1048576, effectively limiting the visible range of the sheet.


