
How to add a comma after a number in Excel
 By
SpreadCheaters
By
SpreadCheaters
Adding commas after numbers in Excel is important as it enhances readability, improves data presentation, ensures consistency during data analysis, accommodates different regional number formats, and maintains compatibility with other systems or databases. It improves the visual appearance of numbers, facilitates easier interpretation of large data sets, and reduces the chances of misinterpretation or errors.
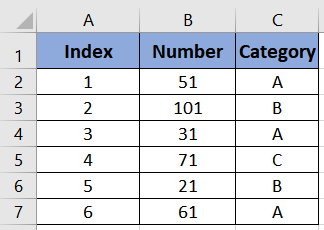
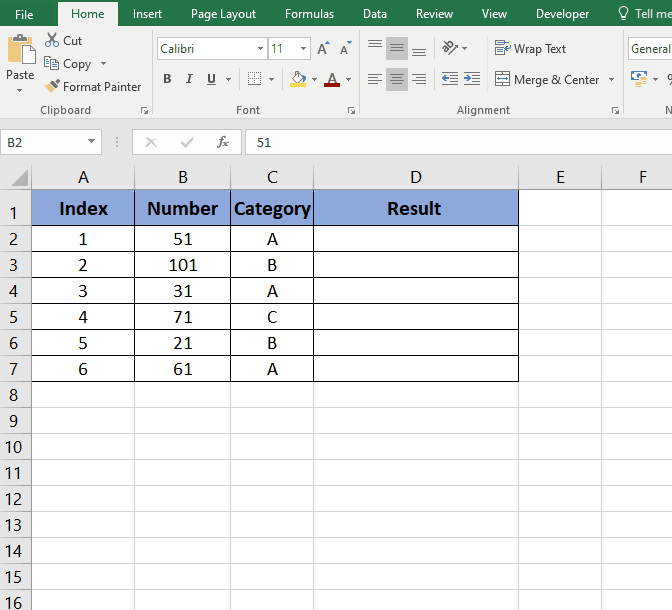
The provided data set is presented in a table format with three columns: “Index,” “Number,” and “Category.” It consists of random numerical values assigned to each index and categorized into different groups. This data set can be used for various analytical purposes, including studying relationships between numbers and categories or identifying trends within specific groups.
Method – 1 Using the & operator
In Excel, the ampersand operator is employed to merge multiple texts. In this approach, we will utilize this operator to prepend the number with a comma “,”. By enclosing the “,” within quotation marks, we will combine it with the number.
Step – 1 Type the Formula
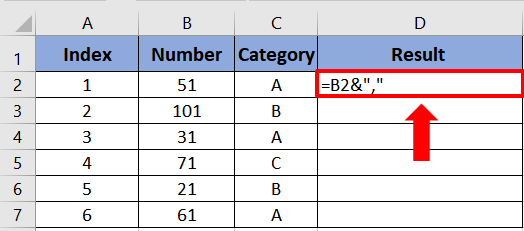
- Open your Excel sheet with the respective data.
- Now enter the following formula with respect to your data.
=B2&”,”
Step – 2 Apply formula to the rest of the cells
- After you have written the formula, press Enter and your formula will be applied.
- Now in order to apply this formula to other cells simply drag the cursor from the corner of the cell.
Method – 2 using CONCATENATE function
You can add “,” in front of numbers in Excel by using the CONCATENATE function. This function allows you to combine the number you want to modify with the text string “,“, resulting in a new value where “,” is positioned at the end.
Step – 1 Type the formula
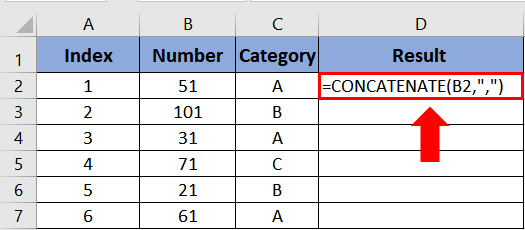
- Open your Excel sheet with the respective data.
- Now enter the following formula with respect to your data.
- =CONCATENATE(B2, “,”)
Step – 2 Drag to autofill
- After you have written the formula, press Enter and your formula will be applied.
- Now in order to apply this formula to other cells simply drag the cursor from the corner of the cell to autofill.
Method – 3 Using Format Cells Options
In Excel, the “Format Cells” feature provides a range of formatting options that allow us to change the visual appearance of data without altering the underlying values. This feature can be utilized to add “1” in front of a number without actually modifying the number itself. By selecting a suitable formatting option, such as adding a custom prefix or adjusting the number format, we can achieve the desired result of displaying the number with “,” in front while maintaining the original numerical value intact.
Step – 1 Open the Format cells prompt
- To begin, choose the range of cells B2:B7.
- Next, perform a right-click.
- Among the provided choices, opt for Format Cells.
- As a result, a dialog box will open, prompting further actions.
Step – 2 Go to Custom

- In the prompt, go to Custom under Category.
- Then, in the box under the Type option type, # “,”.
- Finally, click OK as a result, we will find a “,”added to the numbers in those cells.
Conclusion:
In conclusion, adding “,” in front of numbers in Excel can be important for several reasons. It enhances data consistency by providing a uniform format to distinguish numbers from other types of data. It aids in data interpretation by providing additional context or information about the numbers. It also facilitates sorting and filtering operations, as the prefixed numbers can be treated as text, allowing for easier organization and analysis of the data. Moreover, the ability to add prefixes in Excel enables efficient data management and improves the overall clarity and usability of numerical information.


